> ## Documentation Index
> Fetch the complete documentation index at: https://docs.shoppex.io/llms.txt
> Use this file to discover all available pages before exploring further.
# Shoppex Wallet
> Accept Bitcoin and Litecoin into a self-custodial wallet only you control.
The Shoppex Wallet is a native, self-custodial crypto wallet for accepting Bitcoin and Litecoin. Buyers pay straight into a wallet that belongs to you. Shoppex never holds the funds and cannot move them. It is the wallet-you-control option in **Settings → Payments**, alongside provider-based crypto (Cryptomus, Oxapay).
**Your money stays yours.** Payments go straight into your wallet. Shoppex never holds your funds and cannot access them. Only you, with your wallet password and recovery phrase, can move the money.
## How it works
When you create a wallet, the keys and recovery phrase are generated **on your device** and encrypted with a password you choose. Shoppex only ever receives an encrypted backup that it **cannot open**. There is no Shoppex copy of your keys, your password, or your recovery phrase.
* **Keys never leave your device unencrypted.** Wallet creation and transaction signing both happen locally in your browser.
* **Payments arrive on-chain, directly.** A buyer who pays with crypto sends to an address derived from *your* wallet. The coins land in your wallet the moment the transaction confirms.
* **Only you can spend.** Moving funds requires your wallet password to decrypt the keys, plus an account step-up (your dashboard password or two-factor code). Both run on your device.
This is the trade-off of self-custody: full control, and full responsibility. If you lose both your wallet password and your recovery phrase, no one, including Shoppex, can recover your funds. See [Recovery and loss](#recovery-and-loss).
### Fees
Because funds settle straight to your wallet on-chain, there is no payment processor in the middle taking a cut. The Shoppex Wallet is the lowest-fee way to accept crypto:
* **No extra Shoppex fee for crypto processing.** Shoppex does not add a processing fee on top of native crypto payments.
* **You only pay the network fee.** The blockchain's mining/network fee is the only deduction on a transfer, and it goes to the network, not to Shoppex. There is no provider margin layered on top.
* **Providers charge their own fee.** Accepting crypto through a provider instead (Cryptomus, Oxapay) routes the money through them, and they take their own processing fee before it reaches you. The native wallet skips that entirely.
The standard **Shoppex platform fee still applies**. It is the same across every payment method and is not tied to crypto. The points above are only about *crypto processing* costs. See [How payments work](/payments/gateways) for how the platform fee works.
### Supported chains
Native segwit (`bc1…`) receiving addresses. Pays directly to your wallet on-chain.
Native segwit (`ltc1…`) receiving addresses. Same self-custodial model as Bitcoin.
Both chains share one recovery phrase. Activating the wallet sets up Bitcoin and Litecoin together.
## Set up your wallet
Open **Settings → Payments** and find the **Shoppex Wallet** section. If you have not set one up yet, you will see the onboarding wizard.
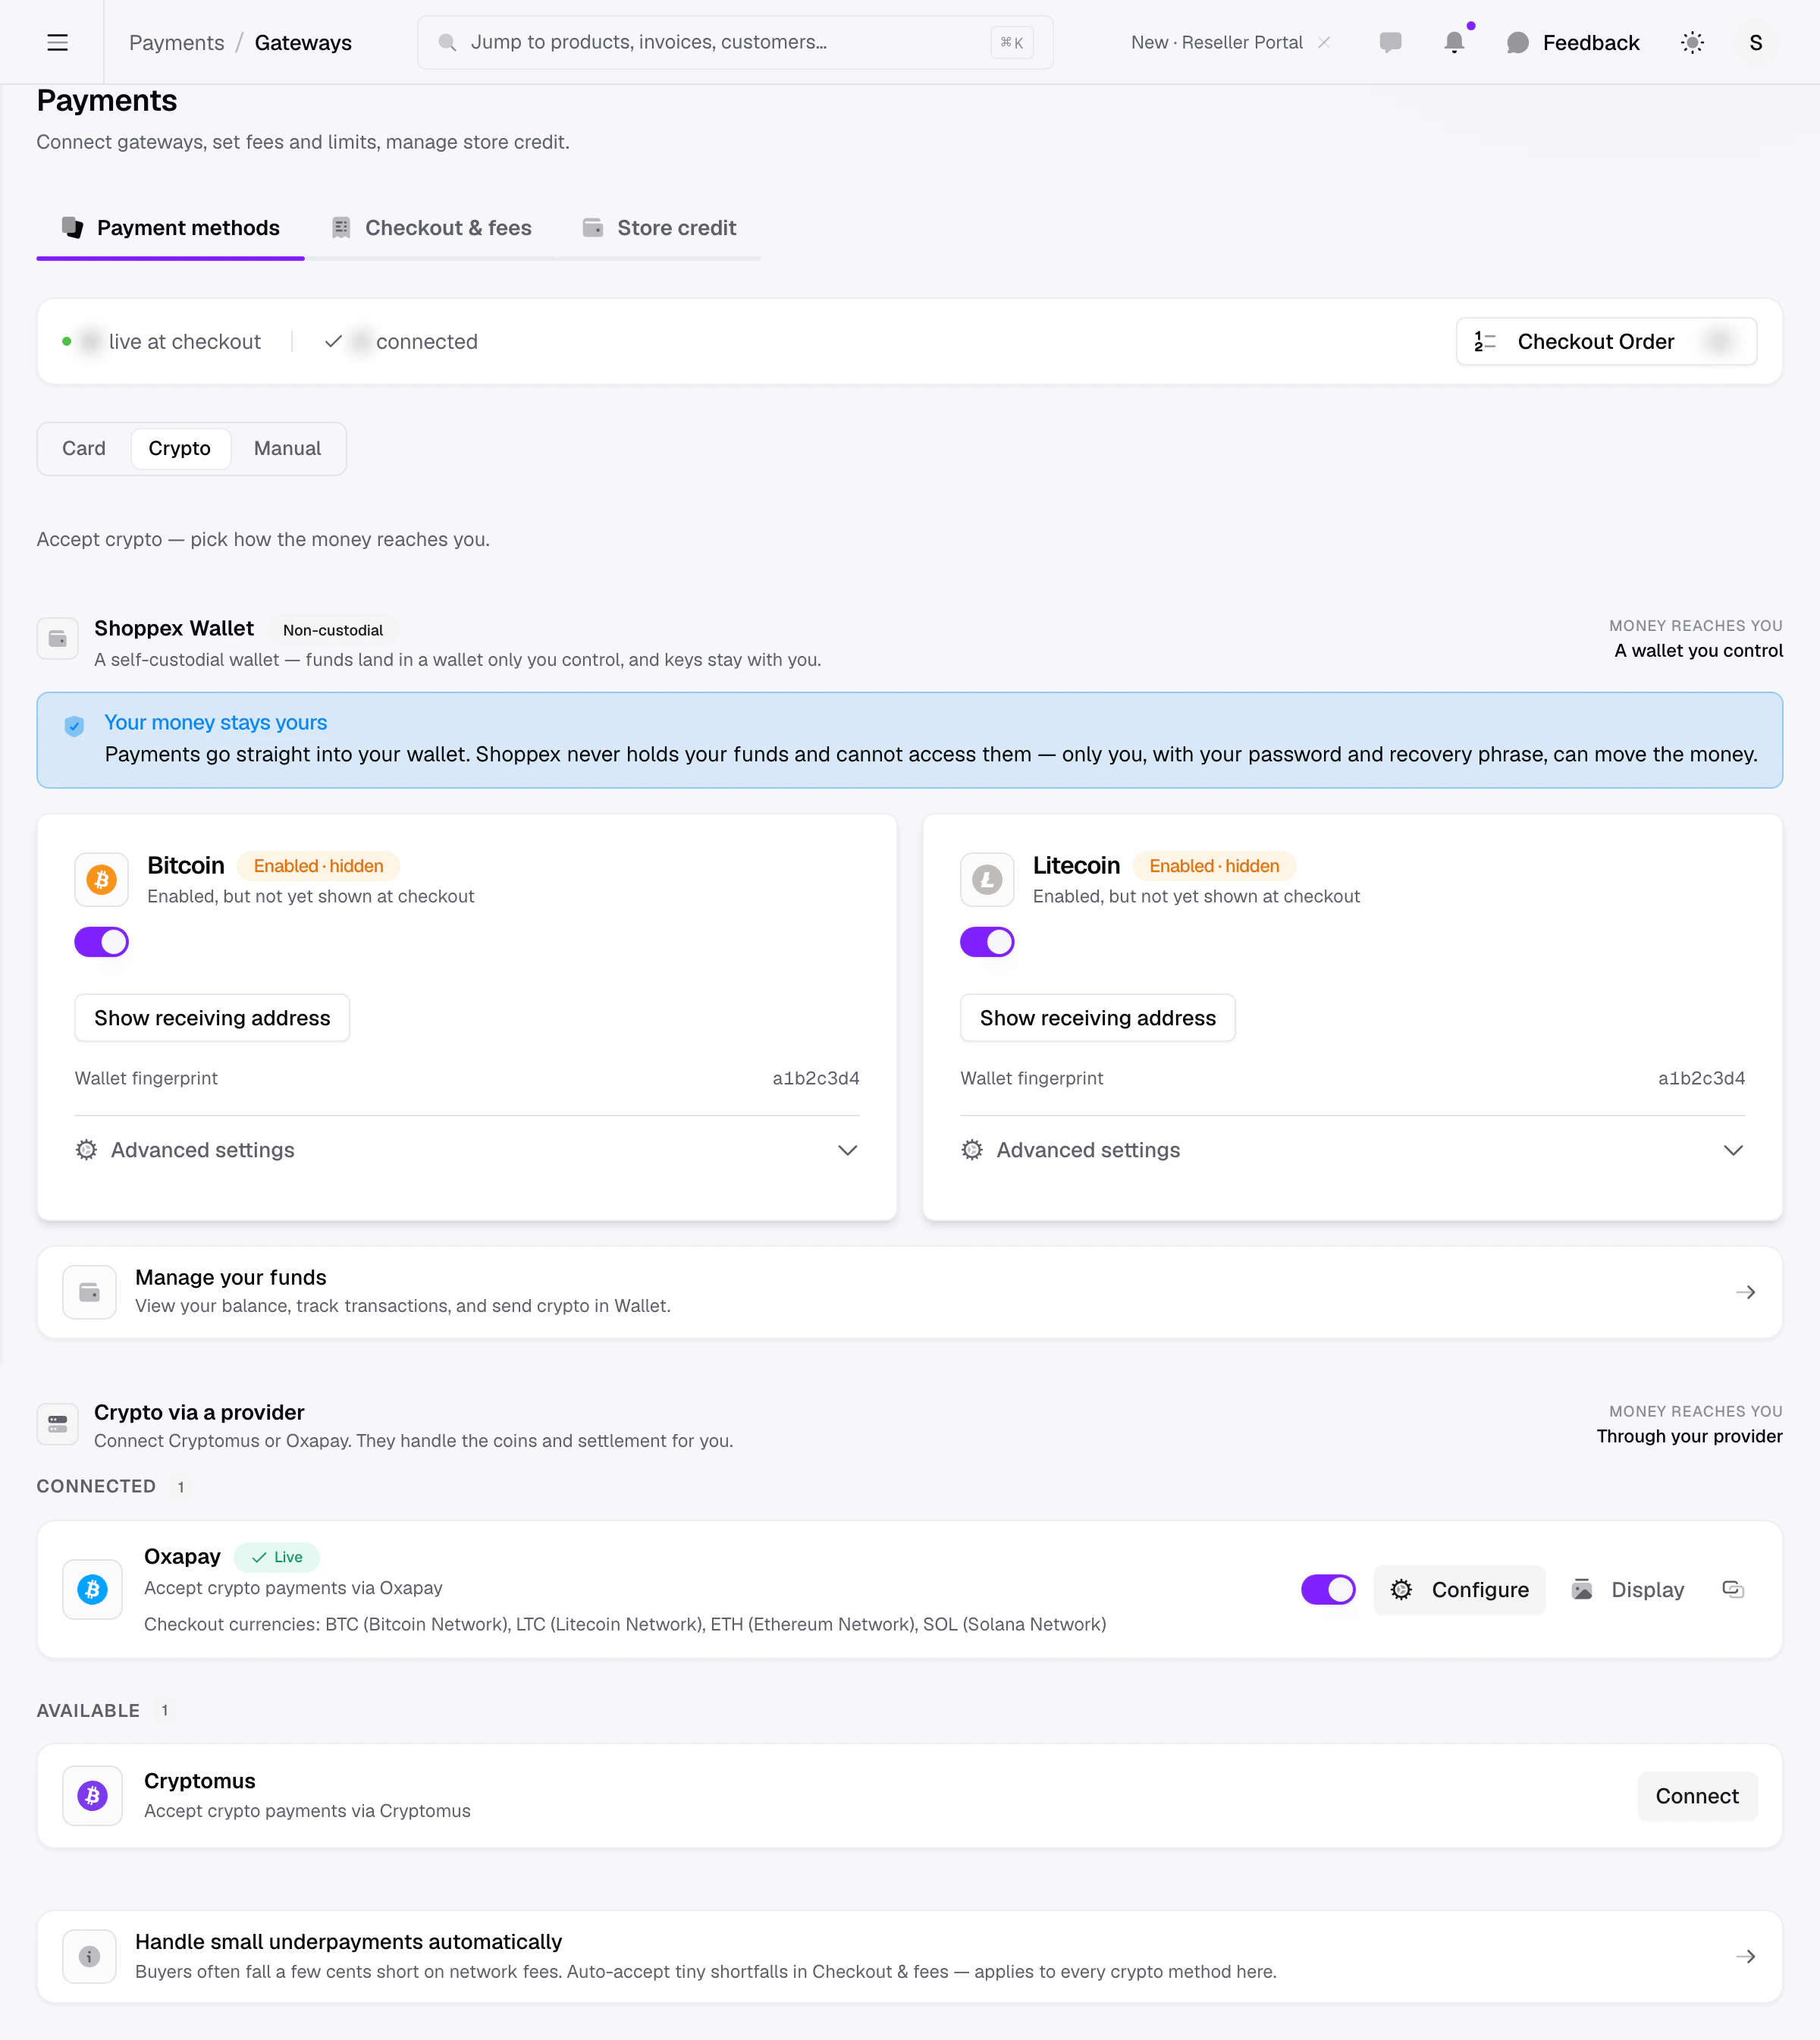 The whole flow happens on your device in three steps.
Shoppex generates a fresh wallet on this device the moment the wizard opens. It creates the keys and a 12-word recovery phrase locally, and never sends them anywhere in the clear.
The whole flow happens on your device in three steps.
Shoppex generates a fresh wallet on this device the moment the wizard opens. It creates the keys and a 12-word recovery phrase locally, and never sends them anywhere in the clear.
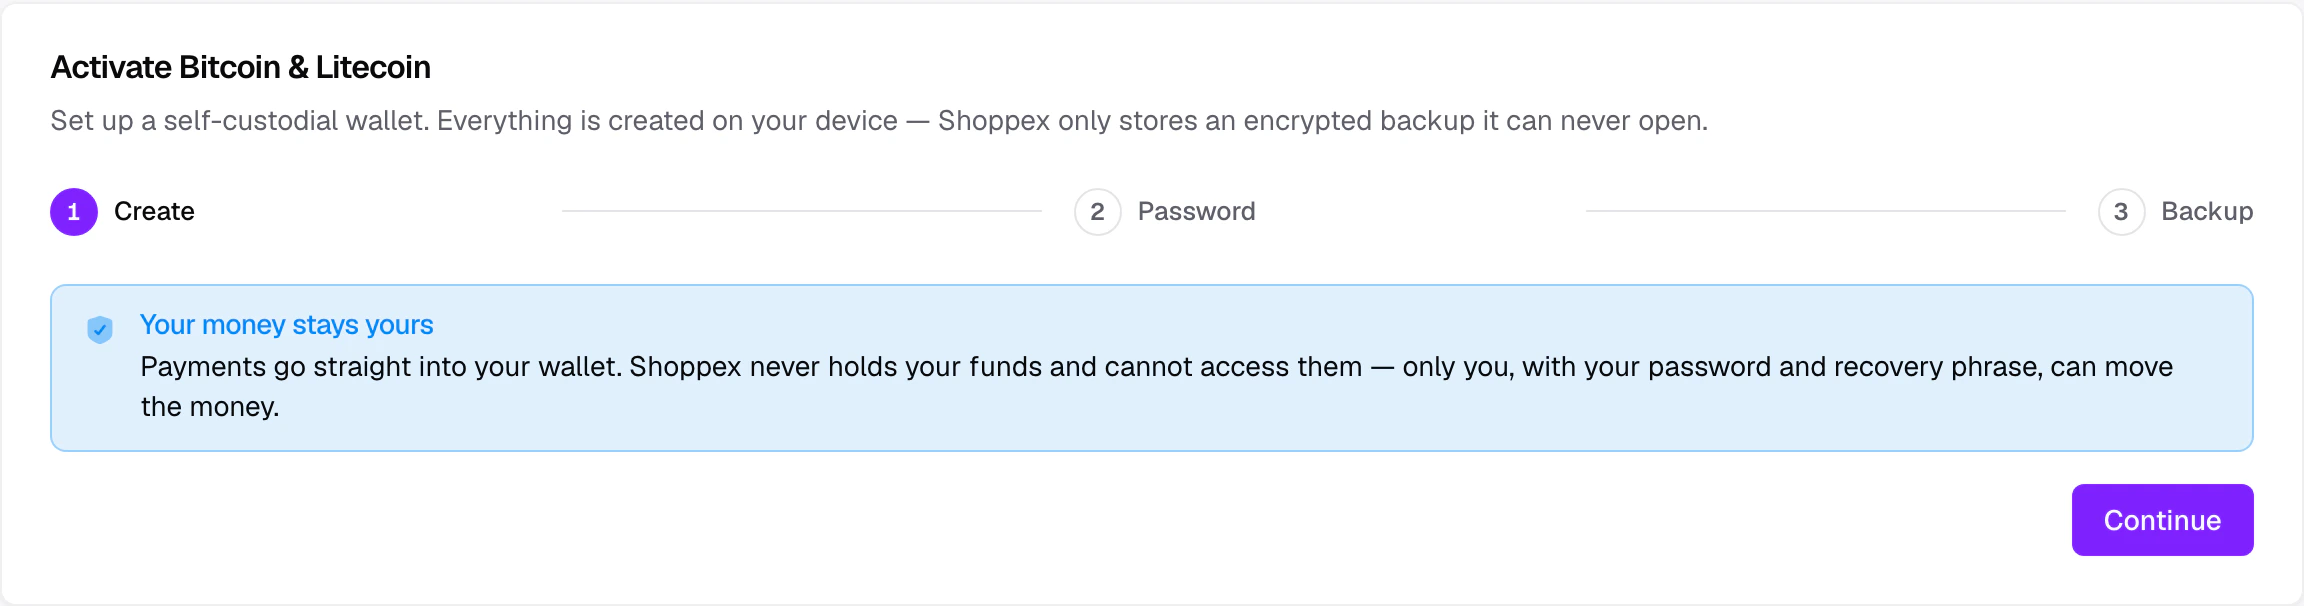 Wallet creation needs a secure (`https`) connection. If your browser blocks it, you will see the error "Could not create a wallet." Load the dashboard over HTTPS and try again.
Choose a **wallet password**. It encrypts your wallet on this device and is required every time you send funds. Shoppex never receives it.
Your **wallet password** is **not** your Shoppex account login. It is a separate password that encrypts your keys locally. Shoppex can reset your account login by email. It can **never** reset or recover your wallet password. If you lose it, only your recovery phrase can restore access.
A strength meter guides you toward a strong password, and you confirm it once to avoid typos.
Wallet creation needs a secure (`https`) connection. If your browser blocks it, you will see the error "Could not create a wallet." Load the dashboard over HTTPS and try again.
Choose a **wallet password**. It encrypts your wallet on this device and is required every time you send funds. Shoppex never receives it.
Your **wallet password** is **not** your Shoppex account login. It is a separate password that encrypts your keys locally. Shoppex can reset your account login by email. It can **never** reset or recover your wallet password. If you lose it, only your recovery phrase can restore access.
A strength meter guides you toward a strong password, and you confirm it once to avoid typos.
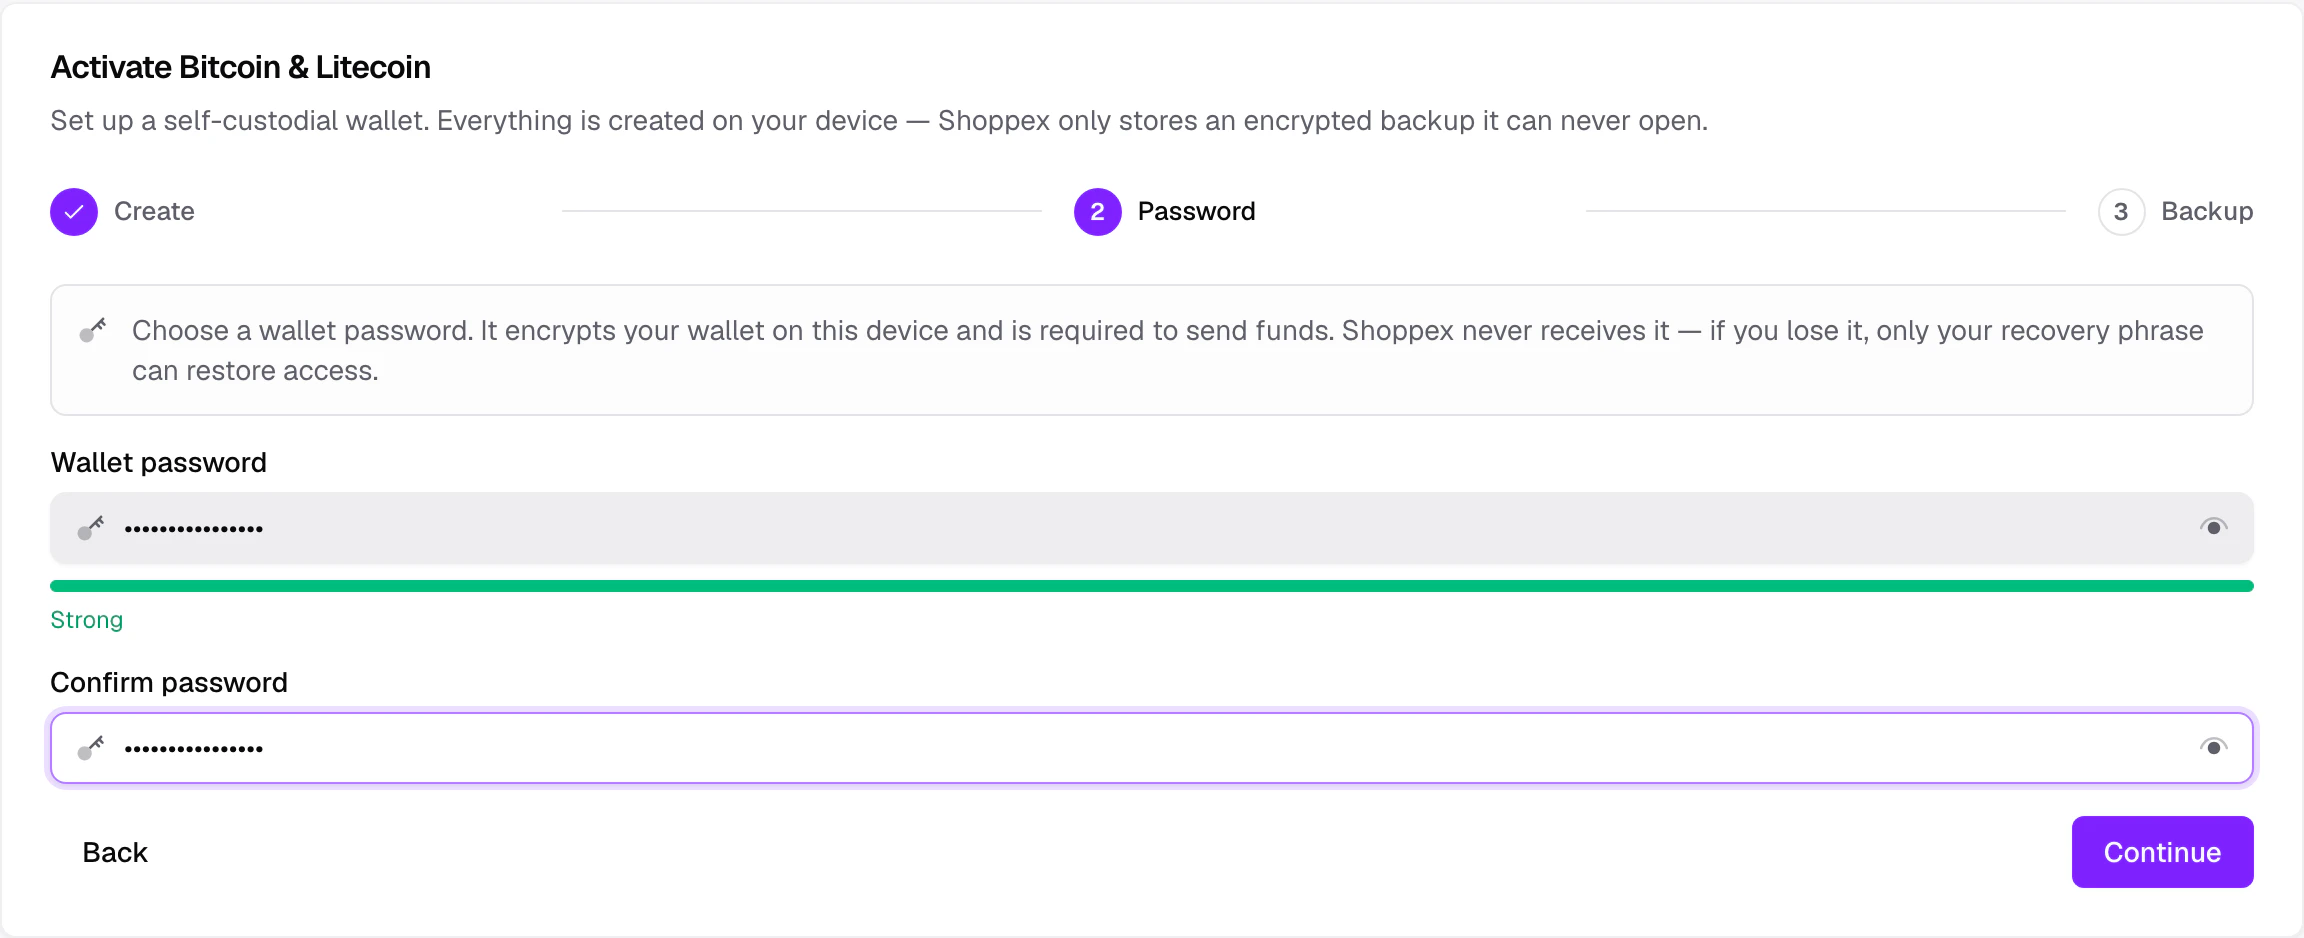 Your **12-word recovery phrase** is shown **once**. Write it down, in order, and store it offline, never in a screenshot, cloud note, or email. Anyone who has this phrase can take your funds.
Before you can activate the wallet, you confirm two statements. The first says you have stored the phrase safely. The second says you understand that no one can recover your funds without it. You then pass a short **verify challenge** by re-typing a few of the words, to prove you saved them correctly.
Your **12-word recovery phrase** is shown **once**. Write it down, in order, and store it offline, never in a screenshot, cloud note, or email. Anyone who has this phrase can take your funds.
Before you can activate the wallet, you confirm two statements. The first says you have stored the phrase safely. The second says you understand that no one can recover your funds without it. You then pass a short **verify challenge** by re-typing a few of the words, to prove you saved them correctly.
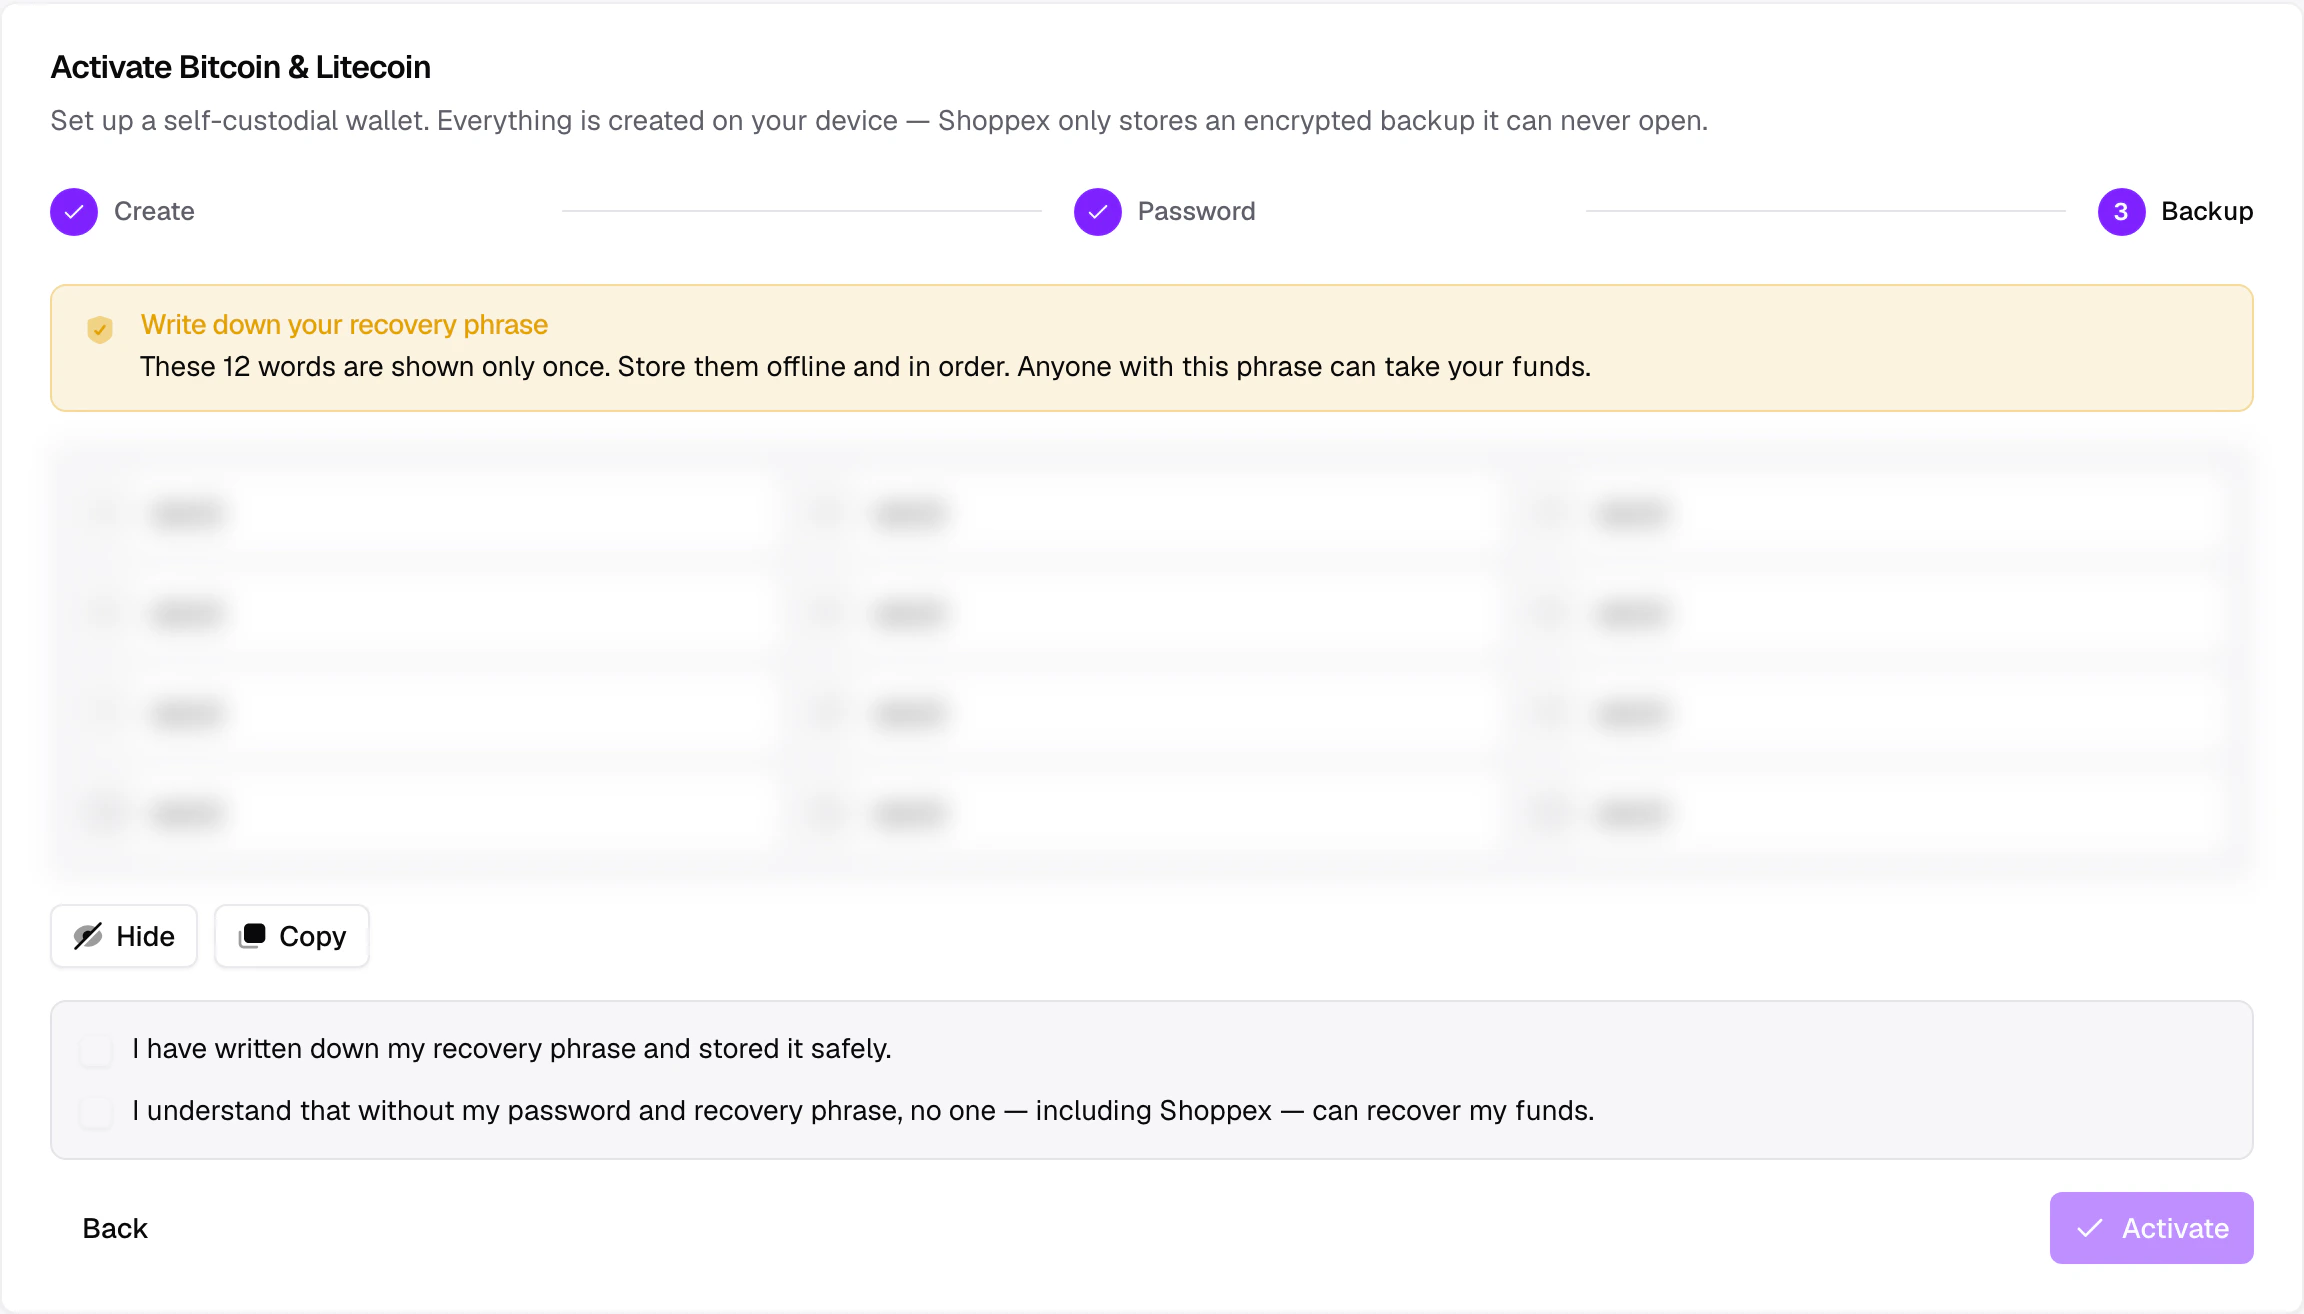 Once verified, **Activate** sets up Bitcoin and Litecoin. From here on, the only copies of your keys are your wallet password and your recovery phrase, both held by you alone.
### Wallet password vs. account login
This is the most common point of confusion:
| | Account login | Wallet password |
| -------------------- | ---------------------- | --------------------------------------------- |
| **What it unlocks** | Your Shoppex dashboard | Your encrypted crypto keys, on this device |
| **Who can reset it** | You, through email | **No one** — not even Shoppex |
| **If lost** | Reset through email | Recoverable **only** with your 12-word phrase |
You will be asked for **both** when you send crypto: your account credential (or two-factor code) to confirm it is you, and your wallet password to sign the transaction.
## Manage your funds
Day-to-day banking lives in the **Wallet** area, separate from the setup screen in Settings. This covers balances, receiving, sending, and history. The header marks it **Self-custodial · Bitcoin & Litecoin**.
Once verified, **Activate** sets up Bitcoin and Litecoin. From here on, the only copies of your keys are your wallet password and your recovery phrase, both held by you alone.
### Wallet password vs. account login
This is the most common point of confusion:
| | Account login | Wallet password |
| -------------------- | ---------------------- | --------------------------------------------- |
| **What it unlocks** | Your Shoppex dashboard | Your encrypted crypto keys, on this device |
| **Who can reset it** | You, through email | **No one** — not even Shoppex |
| **If lost** | Reset through email | Recoverable **only** with your 12-word phrase |
You will be asked for **both** when you send crypto: your account credential (or two-factor code) to confirm it is you, and your wallet password to sign the transaction.
## Manage your funds
Day-to-day banking lives in the **Wallet** area, separate from the setup screen in Settings. This covers balances, receiving, sending, and history. The header marks it **Self-custodial · Bitcoin & Litecoin**.
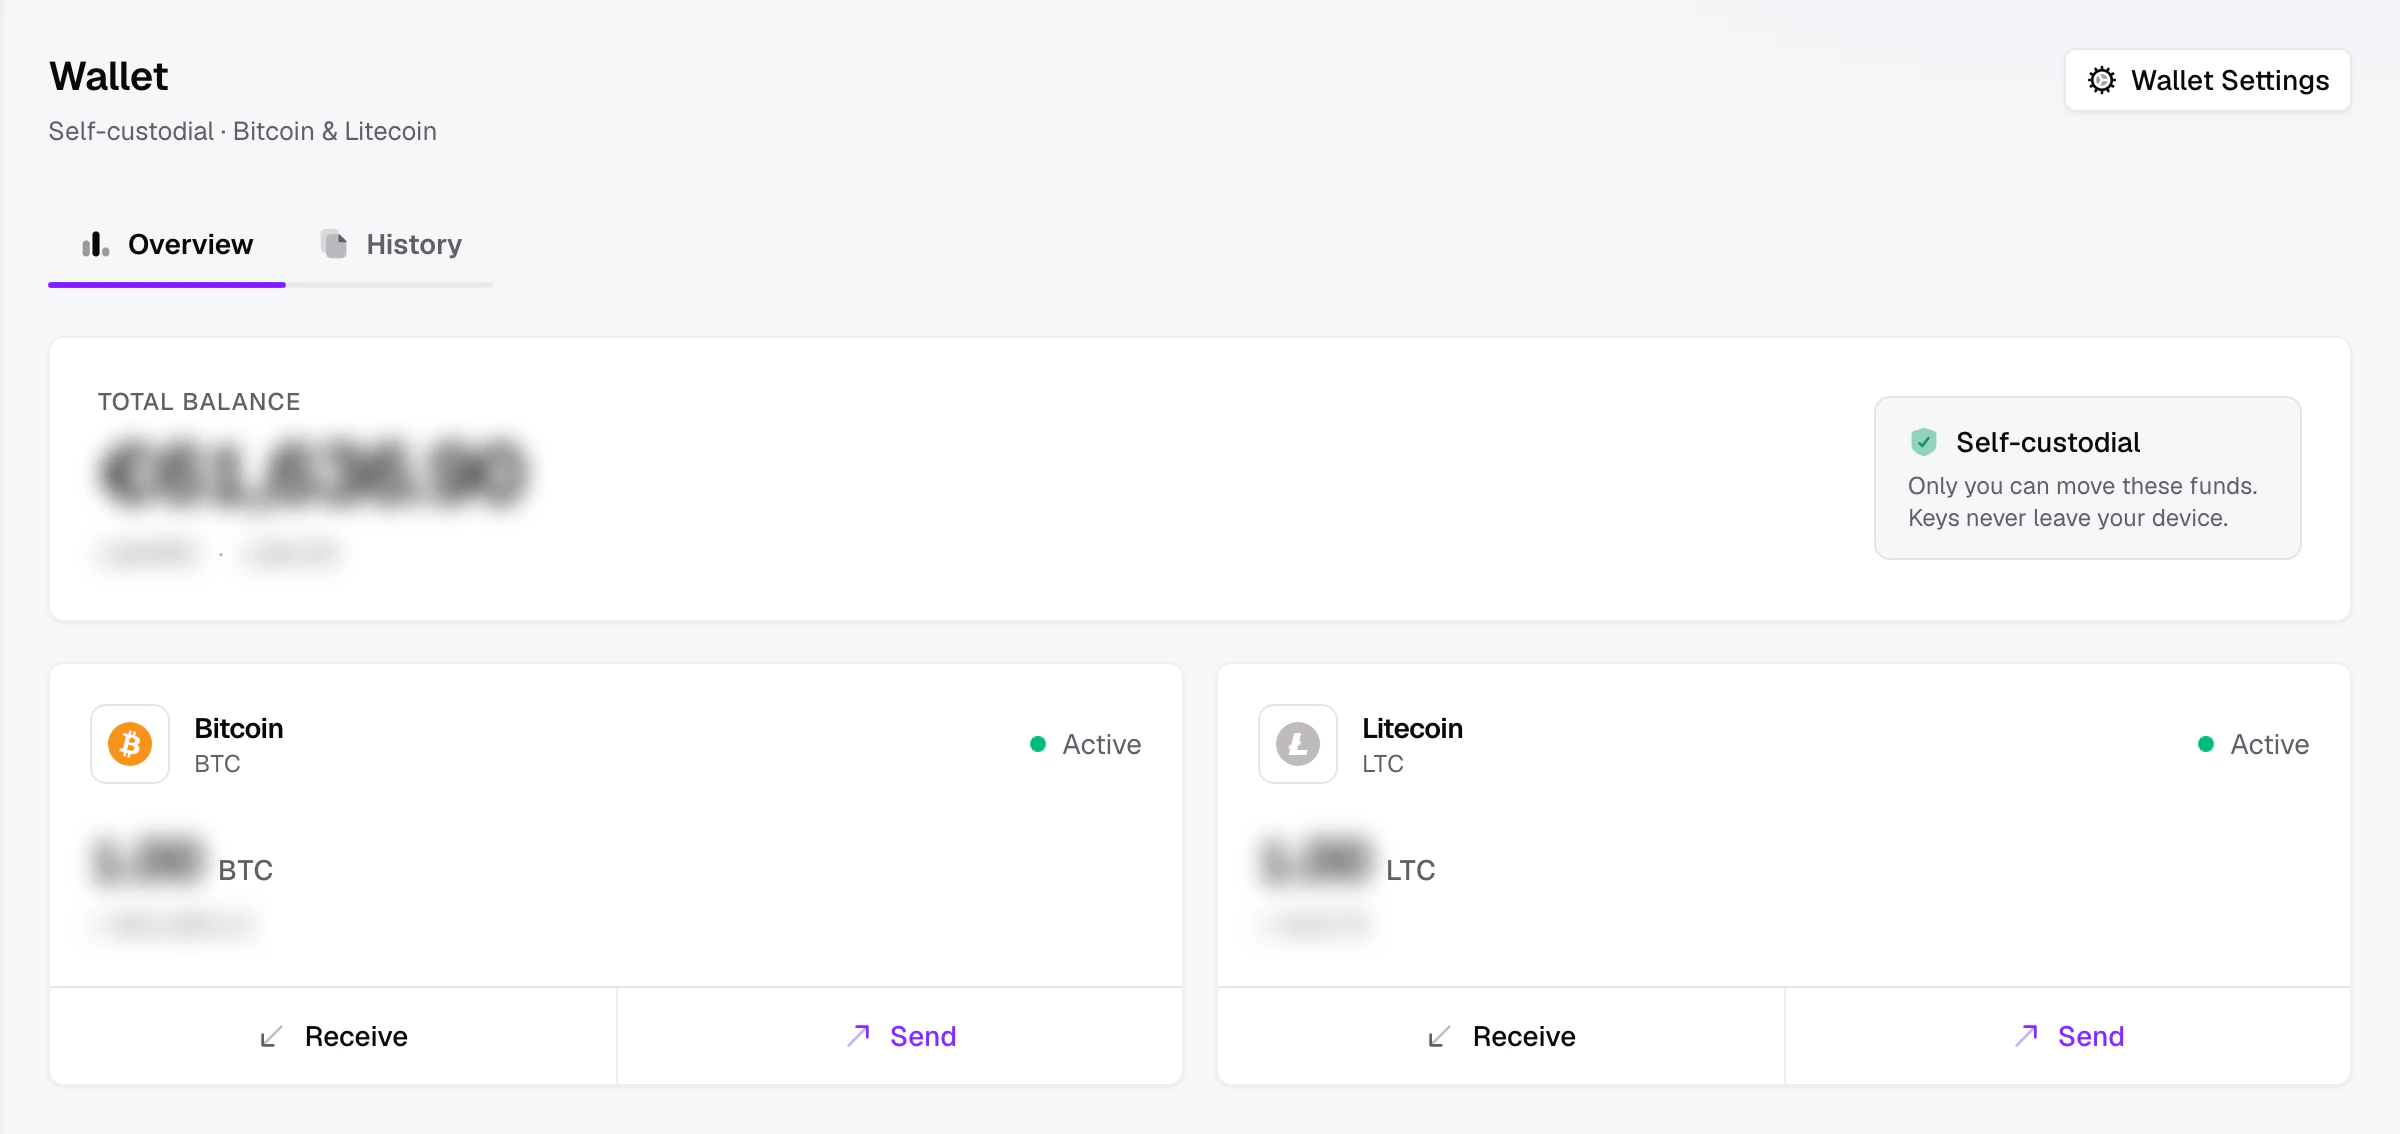 The overview shows a combined balance, in your fiat currency when live rates are available. It also shows a card per coin, with its balance, an estimated fiat value, and **Receive** / **Send** actions. A **Pending** badge means a transaction is on-chain but not yet fully confirmed.
### Receive
Click **Receive** on a coin to get a payment address.
* A **fresh address** is generated for every receipt — standard practice that keeps your incoming payments harder to link together. Reusing an old address still works, but a new one is better.
* The dialog shows the address as text and as a **QR code**. Copy it, or let the payer scan it.
* **Only send the matching coin to this address.** Sending Bitcoin to a Litecoin address (or any other asset) results in permanent loss. The networks are separate.
The overview shows a combined balance, in your fiat currency when live rates are available. It also shows a card per coin, with its balance, an estimated fiat value, and **Receive** / **Send** actions. A **Pending** badge means a transaction is on-chain but not yet fully confirmed.
### Receive
Click **Receive** on a coin to get a payment address.
* A **fresh address** is generated for every receipt — standard practice that keeps your incoming payments harder to link together. Reusing an old address still works, but a new one is better.
* The dialog shows the address as text and as a **QR code**. Copy it, or let the payer scan it.
* **Only send the matching coin to this address.** Sending Bitcoin to a Litecoin address (or any other asset) results in permanent loss. The networks are separate.
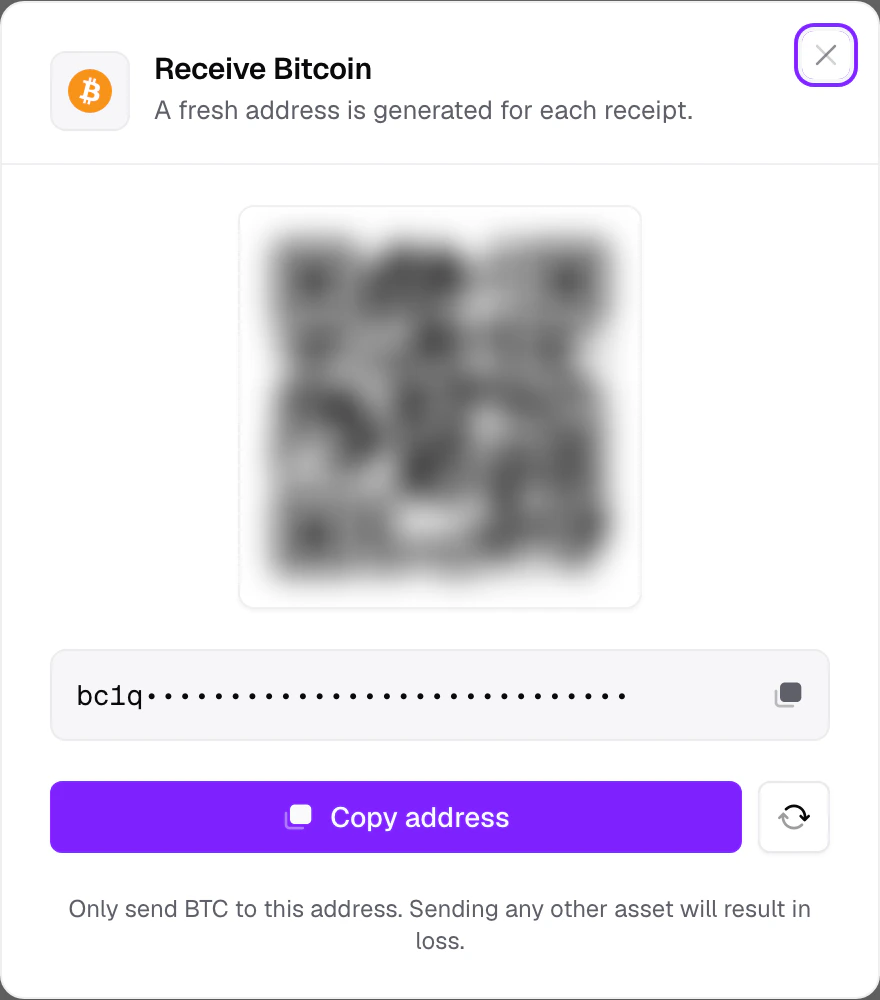 Buyer-paid orders use this same mechanism automatically: Shoppex derives a receive address from your wallet for each crypto invoice. You do not hand out addresses manually for store sales. The **Receive** dialog is for ad-hoc deposits.
### Send
Sending crypto takes deliberate extra steps, because **transfers cannot be reversed**. The flow walks through Details → Review → Sign.
Enter the recipient address and an amount. You can type the amount in the coin or, when a live rate is available, switch to your fiat currency and Shoppex converts it. The address is checked for the right format before you can continue.
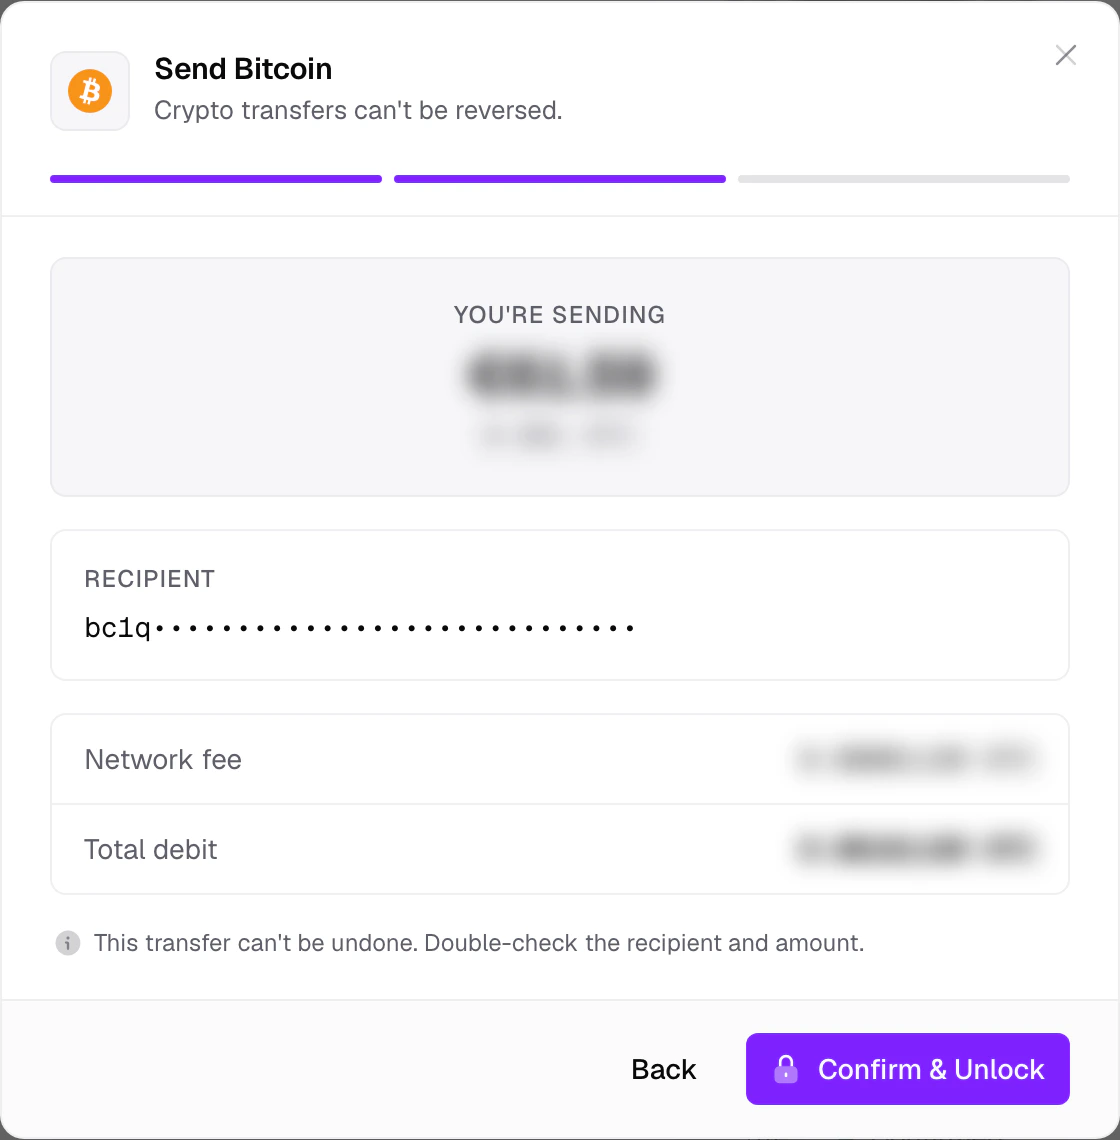
Confirm exactly what you are sending: the amount, the **full recipient address**, the network fee (calculated from current network conditions), and the **total debit**. Double-check the recipient here. This is your last chance before signing.
Buyer-paid orders use this same mechanism automatically: Shoppex derives a receive address from your wallet for each crypto invoice. You do not hand out addresses manually for store sales. The **Receive** dialog is for ad-hoc deposits.
### Send
Sending crypto takes deliberate extra steps, because **transfers cannot be reversed**. The flow walks through Details → Review → Sign.
Enter the recipient address and an amount. You can type the amount in the coin or, when a live rate is available, switch to your fiat currency and Shoppex converts it. The address is checked for the right format before you can continue.
Confirm exactly what you are sending: the amount, the **full recipient address**, the network fee (calculated from current network conditions), and the **total debit**. Double-check the recipient here. This is your last chance before signing.
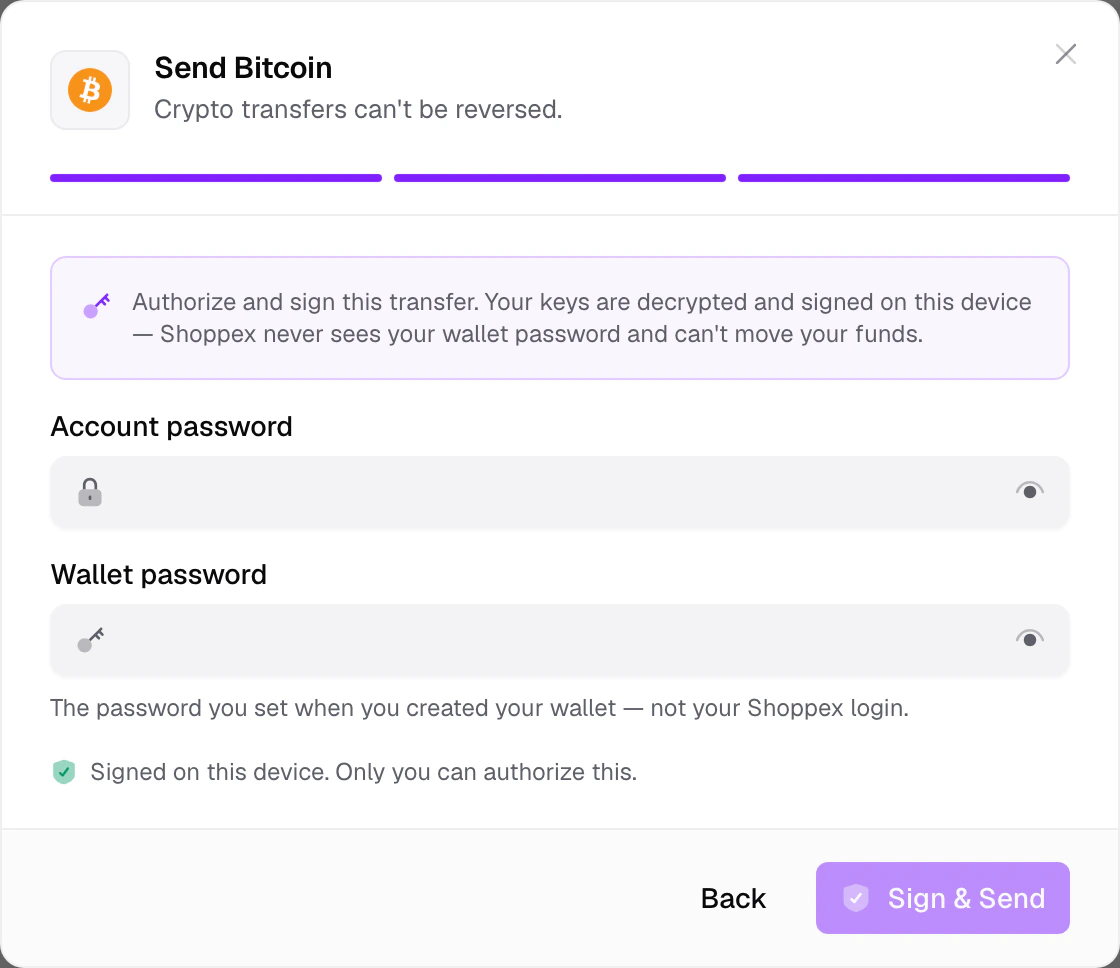
 Authorize and sign on this device. You enter two things:
* Your **account password** (or **two-factor code**) — confirms it is you.
* Your **wallet password** — decrypts your keys so the transaction can be signed locally.
Shoppex never sees your wallet password and cannot move your funds. Only the signed transaction is broadcast to the network. Your keys never leave the device.
Authorize and sign on this device. You enter two things:
* Your **account password** (or **two-factor code**) — confirms it is you.
* Your **wallet password** — decrypts your keys so the transaction can be signed locally.
Shoppex never sees your wallet password and cannot move your funds. Only the signed transaction is broadcast to the network. Your keys never leave the device.
 Crypto transfers are **final**. There is no chargeback and no undo. If you send to the wrong address or the wrong amount, Shoppex cannot reverse it. Always confirm the recipient on the Review step.
The network confirmation can fail to return cleanly, for example after a brief connection drop. When that happens, the dialog keeps the signed transaction and offers **Retry Send**, which re-sends the same transaction. This prevents accidentally signing a second one and spending twice. Do not close the dialog while that retry is pending.
### Transactions and history
Every incoming and outgoing transfer appears in **Recent activity** on the overview, and in full in the **History** tab. Click any row to open its detail sheet.
Crypto transfers are **final**. There is no chargeback and no undo. If you send to the wrong address or the wrong amount, Shoppex cannot reverse it. Always confirm the recipient on the Review step.
The network confirmation can fail to return cleanly, for example after a brief connection drop. When that happens, the dialog keeps the signed transaction and offers **Retry Send**, which re-sends the same transaction. This prevents accidentally signing a second one and spending twice. Do not close the dialog while that retry is pending.
### Transactions and history
Every incoming and outgoing transfer appears in **Recent activity** on the overview, and in full in the **History** tab. Click any row to open its detail sheet.
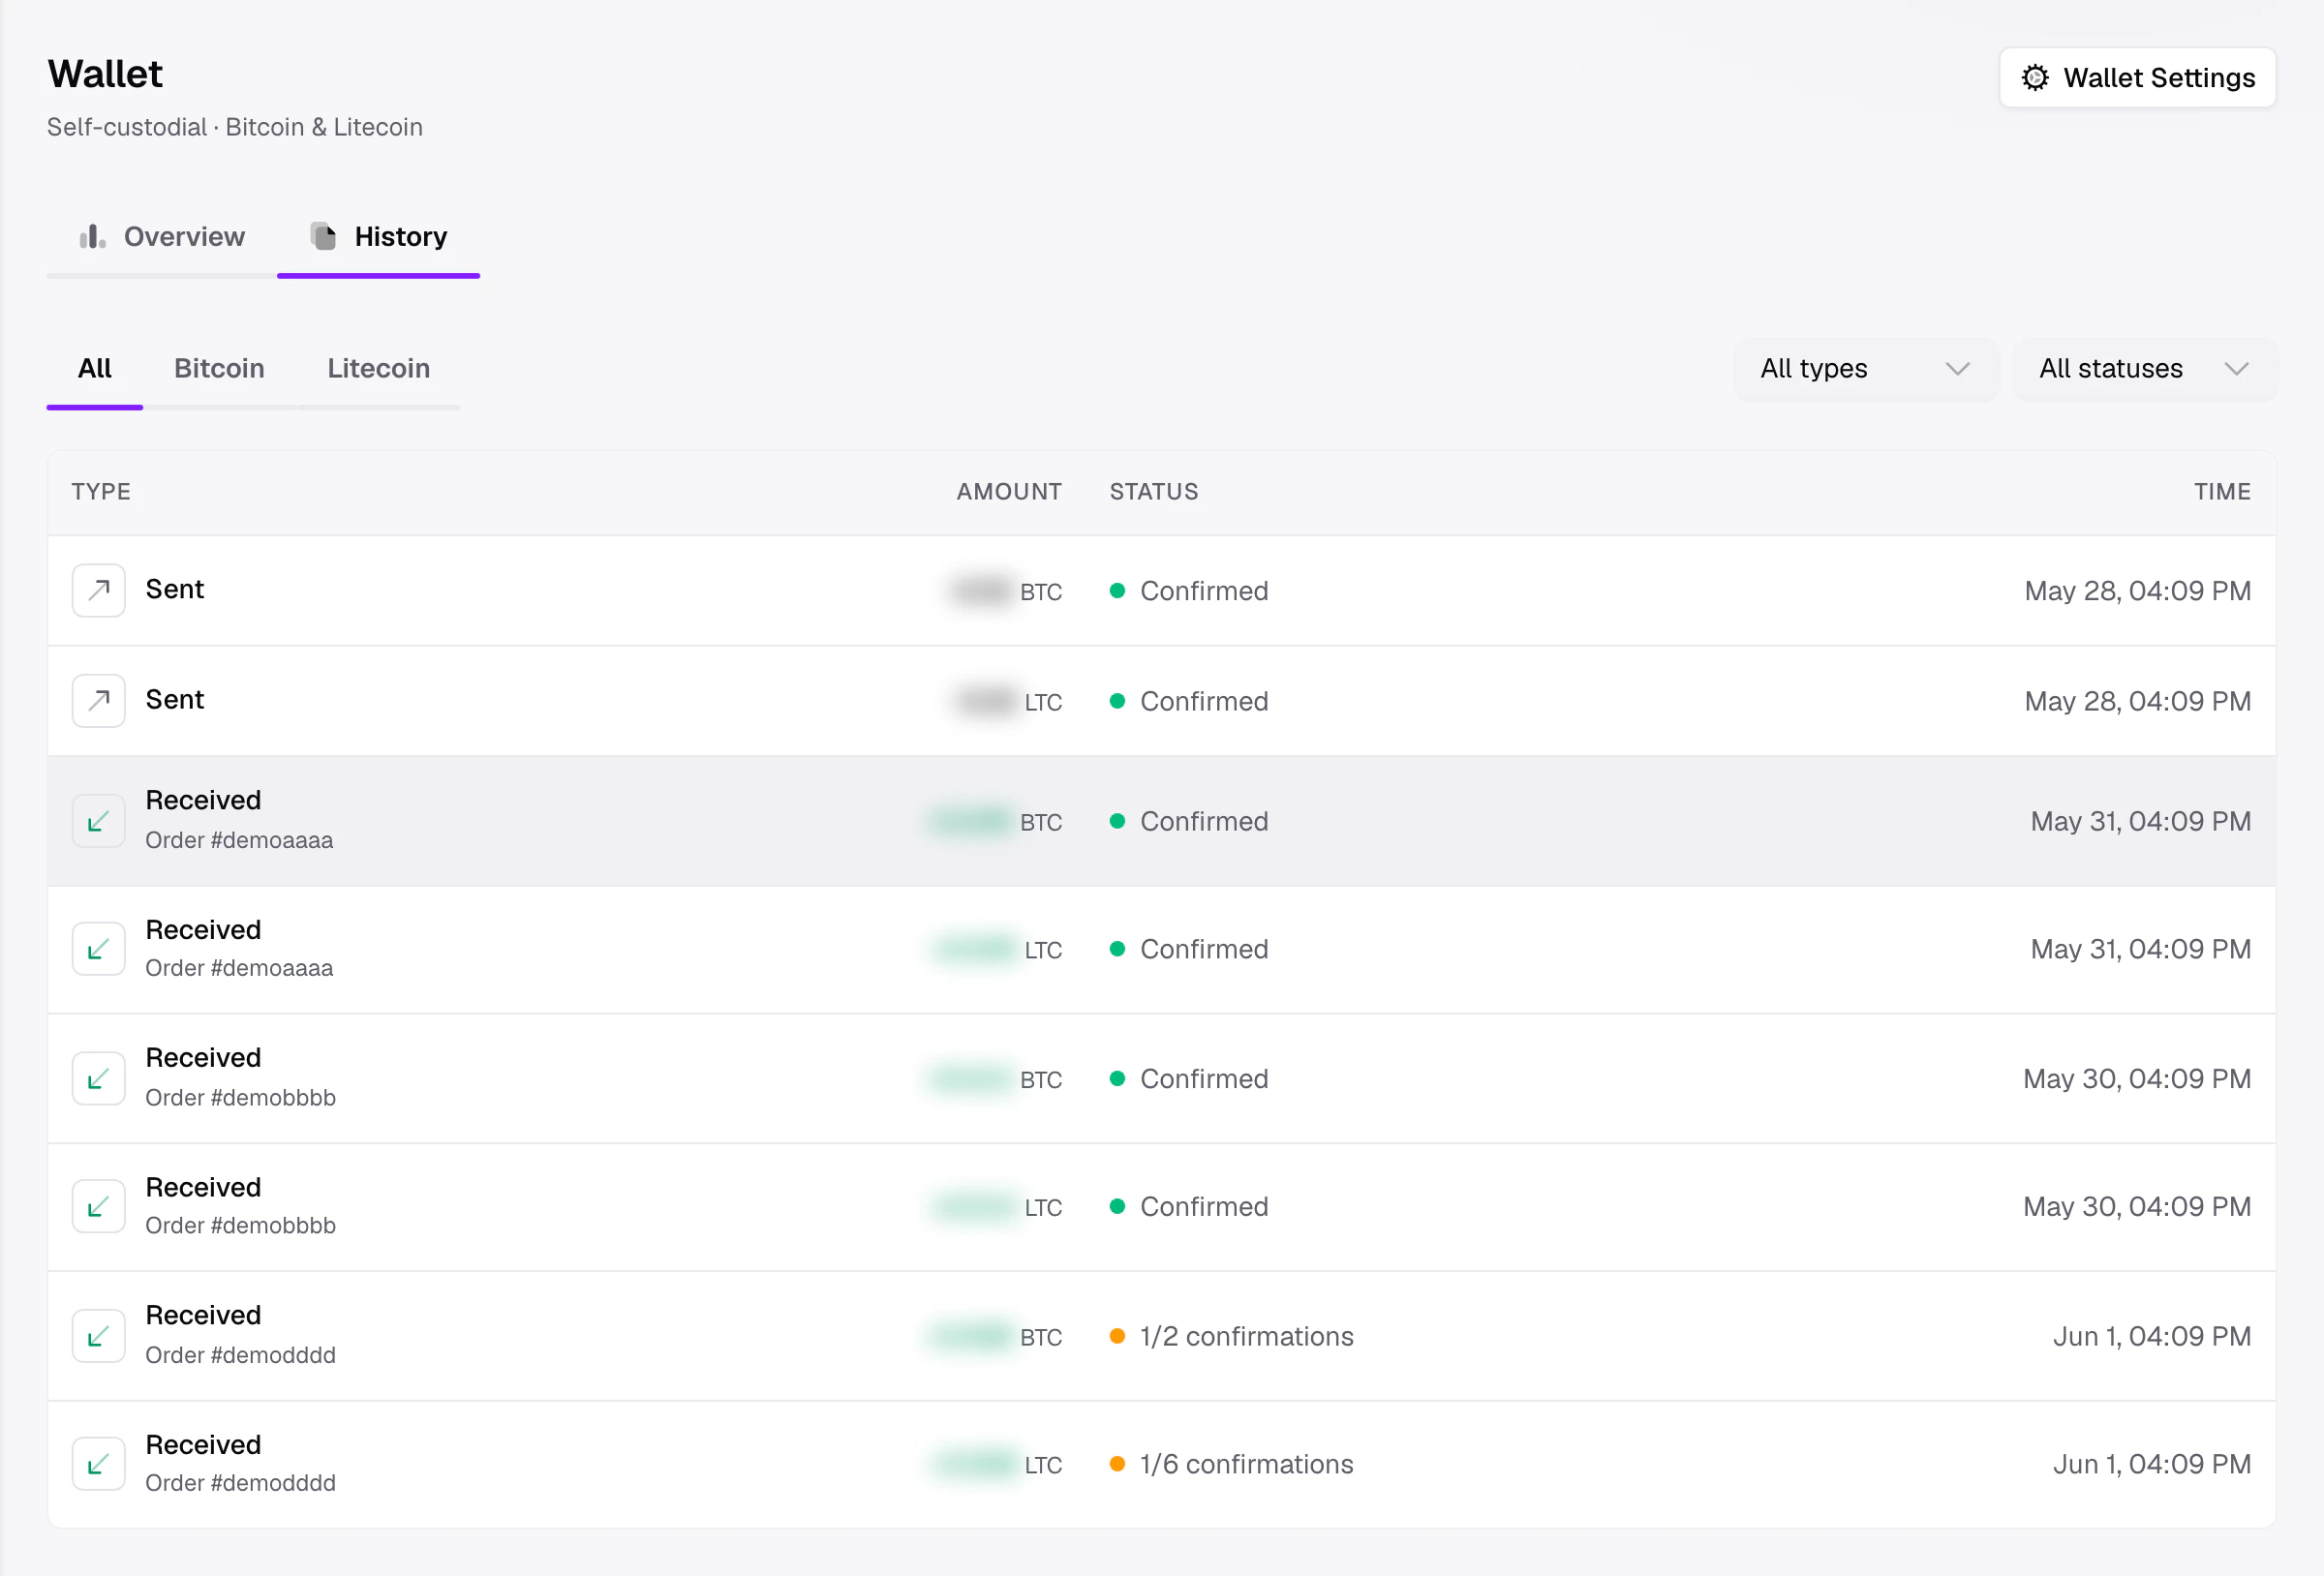 Each transaction has a status:
* **Awaiting confirmation / N confirmations** — the transaction is on-chain but has not reached the number of confirmations you require. Shown as a pending/amber state.
* **Confirmed** — enough confirmations have cleared. The funds are settled, and for sales, the order is marked paid.
The detail sheet shows the amount, status, confirmation count, block height, and timestamp. It also shows the linked order (for store sales) and the full transaction ID with a **View on explorer** link.
## Per-chain settings
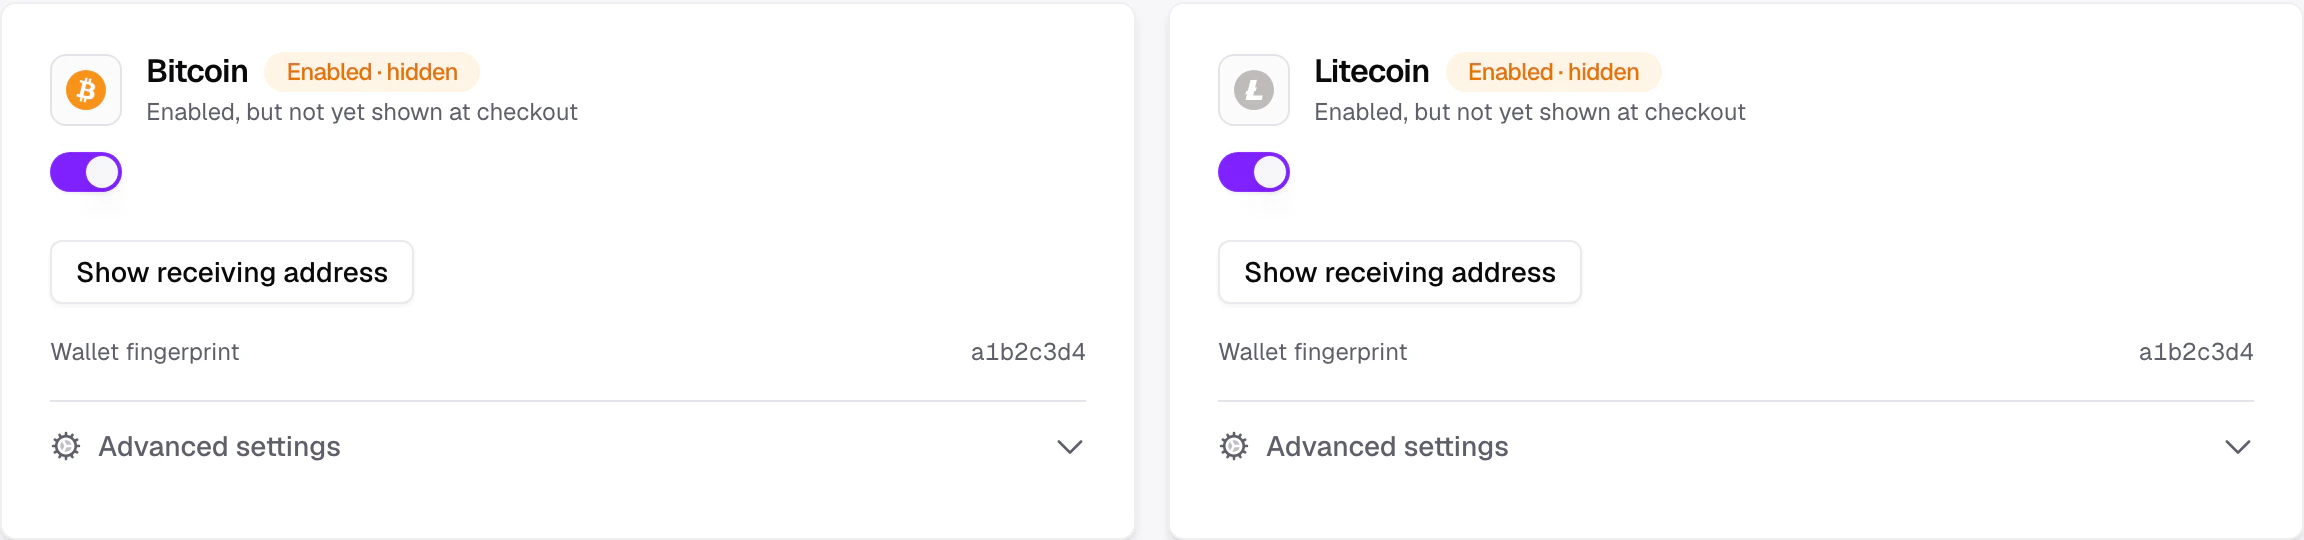
Each active chain has its own status card in the **Shoppex Wallet** section of **Settings → Payments**. A toggle turns the chain on or off, and a badge tells you its checkout state at a glance.
Each transaction has a status:
* **Awaiting confirmation / N confirmations** — the transaction is on-chain but has not reached the number of confirmations you require. Shown as a pending/amber state.
* **Confirmed** — enough confirmations have cleared. The funds are settled, and for sales, the order is marked paid.
The detail sheet shows the amount, status, confirmation count, block height, and timestamp. It also shows the linked order (for store sales) and the full transaction ID with a **View on explorer** link.
## Per-chain settings
Each active chain has its own status card in the **Shoppex Wallet** section of **Settings → Payments**. A toggle turns the chain on or off, and a badge tells you its checkout state at a glance.
 ### Checkout visibility
The badge on each card reflects two things: whether the chain is enabled, and whether it is showing to buyers.
| Badge | Meaning |
| -------------------- | ----------------------------------------------------------------------------- |
| **Live** | Enabled and shown to buyers at checkout. |
| **Enabled · hidden** | Turned on, but not yet appearing at checkout (for example, still finalizing). |
| **Off** | Not accepting payments. |
Each card also shows the wallet **fingerprint**, a short identifier so you can confirm the card maps to the wallet you expect.
### Advanced settings
Open **Advanced settings** on a chain card for the policies you rarely touch:
* **Required confirmations** — how many on-chain confirmations an invoice needs before it clears, from **1 to 12**. More confirmations are safer against chain reorganizations but make buyers wait longer. The card shows a rough estimated wait, based on the chain's block time.
* **Auto-accept underpayments** — crypto buyers often land a few cents short after network fees. This setting completes the order automatically when the shortfall is small. Per chain, you can choose one of three settings. **Use store default** inherits your shop-wide underpayment setting. **On for this coin** forces auto-accept, optionally capped by a max amount and a max percent shortfall. **Off for this coin** never auto-accepts underpayments on this chain. The shop-wide default is configured in **Checkout & fees**, and this per-chain control overrides it for one coin.
* **Recovery backup** — download an encrypted backup of your keys, or reveal your recovery phrase. See [Recovery and loss](#recovery-and-loss) below.
A single **Save changes** commits everything you have adjusted in the Advanced panel at once.
## Recovery and loss
Your wallet exists in two forms only: the encrypted copy on your device (unlocked by your **wallet password**) and your **12-word recovery phrase**. Keep both safe and independent.
### Download an encrypted backup
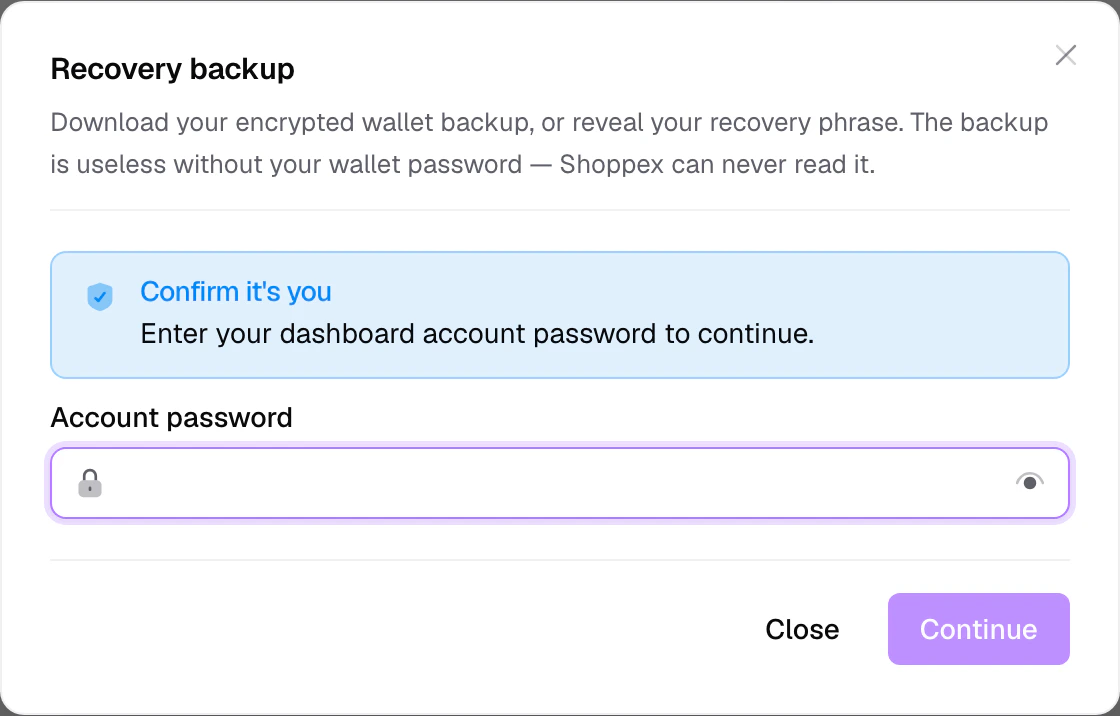
From a chain's **Advanced settings → Recovery backup → Download**, you can save an encrypted backup file. To reach it, you first confirm it is you with an account step-up (your dashboard password, or a two-factor code if you have 2FA enabled).
* The downloaded file is **useless without your wallet password**. Shoppex can never read it.
* It is a safety net for moving your wallet to another device, not a substitute for your recovery phrase.
### Checkout visibility
The badge on each card reflects two things: whether the chain is enabled, and whether it is showing to buyers.
| Badge | Meaning |
| -------------------- | ----------------------------------------------------------------------------- |
| **Live** | Enabled and shown to buyers at checkout. |
| **Enabled · hidden** | Turned on, but not yet appearing at checkout (for example, still finalizing). |
| **Off** | Not accepting payments. |
Each card also shows the wallet **fingerprint**, a short identifier so you can confirm the card maps to the wallet you expect.
### Advanced settings
Open **Advanced settings** on a chain card for the policies you rarely touch:
* **Required confirmations** — how many on-chain confirmations an invoice needs before it clears, from **1 to 12**. More confirmations are safer against chain reorganizations but make buyers wait longer. The card shows a rough estimated wait, based on the chain's block time.
* **Auto-accept underpayments** — crypto buyers often land a few cents short after network fees. This setting completes the order automatically when the shortfall is small. Per chain, you can choose one of three settings. **Use store default** inherits your shop-wide underpayment setting. **On for this coin** forces auto-accept, optionally capped by a max amount and a max percent shortfall. **Off for this coin** never auto-accepts underpayments on this chain. The shop-wide default is configured in **Checkout & fees**, and this per-chain control overrides it for one coin.
* **Recovery backup** — download an encrypted backup of your keys, or reveal your recovery phrase. See [Recovery and loss](#recovery-and-loss) below.
A single **Save changes** commits everything you have adjusted in the Advanced panel at once.
## Recovery and loss
Your wallet exists in two forms only: the encrypted copy on your device (unlocked by your **wallet password**) and your **12-word recovery phrase**. Keep both safe and independent.
### Download an encrypted backup
From a chain's **Advanced settings → Recovery backup → Download**, you can save an encrypted backup file. To reach it, you first confirm it is you with an account step-up (your dashboard password, or a two-factor code if you have 2FA enabled).
* The downloaded file is **useless without your wallet password**. Shoppex can never read it.
* It is a safety net for moving your wallet to another device, not a substitute for your recovery phrase.
 ### Reveal your recovery phrase
In the same dialog, after the account step-up, you can **reveal your 12-word recovery phrase**. Enter your **wallet password**, the one you set when creating the wallet. The phrase is decrypted on your device. It never travels to Shoppex. If you need to re-record your backup, use this option. Treat the screen as sensitive.
**If you lose both your wallet password and your recovery phrase, your funds are gone permanently.** Shoppex holds only an encrypted backup it cannot open. There is no recovery path on our side, no support override, and no way to reset access. This is the cost of true self-custody. Store your recovery phrase offline, in order, somewhere you will not lose it.
## Where this fits
* For payouts, there is nothing to withdraw from Shoppex. Coins are already in your wallet on-chain once they confirm. See [Payouts](/payments/gateways).
* To compare crypto options (self-custodial wallet vs. Cryptomus / Oxapay providers), and to set up the other gateways, see [Payment gateways](/payments/gateways).
### Reveal your recovery phrase
In the same dialog, after the account step-up, you can **reveal your 12-word recovery phrase**. Enter your **wallet password**, the one you set when creating the wallet. The phrase is decrypted on your device. It never travels to Shoppex. If you need to re-record your backup, use this option. Treat the screen as sensitive.
**If you lose both your wallet password and your recovery phrase, your funds are gone permanently.** Shoppex holds only an encrypted backup it cannot open. There is no recovery path on our side, no support override, and no way to reset access. This is the cost of true self-custody. Store your recovery phrase offline, in order, somewhere you will not lose it.
## Where this fits
* For payouts, there is nothing to withdraw from Shoppex. Coins are already in your wallet on-chain once they confirm. See [Payouts](/payments/gateways).
* To compare crypto options (self-custodial wallet vs. Cryptomus / Oxapay providers), and to set up the other gateways, see [Payment gateways](/payments/gateways).